Beautiful Aged Terracotta Pot Paint Makeover
Hi friends! I’m here to share a really simple way to makeover those terracotta planter pots. If the orange clay look isn’t to your liking, or fitting in with your design vision for your indoor or outdoor spaces, this is a quick paint makeover project that I promise you can’t mess up! The most effort I expended was cleaning all my pots and saucers before I began! While I find beauty in the warm, baked clay color of the pots in their natural state, they just didn’t look good with my current patio situation. So I grabbed some paint, and you can too!

You will only need a few things for this project:
-
Terracotta pots & saucers.
-
Chalk style or flat paint. I used American Decor Chalky Paint in Primitive & Everlasting
-
Paint brush(es). Two makes it faster and easier, and chip brushes work perfect.
-
A clean, flat, protected area to work on.
-
Clear water based varnish or a clear non yellowing brush on/or spray poly.

How To Give Terracotta Pots A Pretty Aged Look With Paint
STEP ONE:
Start with clean dry pots & saucers. Mine naturally get a beautiful soft white look to them that I really love. But unfortunately, the green slime finds them if I don’t put them up over the Winter… that isn’t so pretty. I scrubbed mine with dish soap, a soft sponge and a stuff bristle brush. The great things about working with clay pots, is that they dry really quickly. By the time I was done cleaning the last set, the first was dry and ready for paint.
EDITED* I experienced some bled-thru on my pots and I would suggest doing an entire base coat of a matte varnish, poly, etc… to seal before painting. Some pots had a little more bled-thru and efflorescence than others, but I would definitely seal first next time.
As I mentioned, I used two colors of paint. The Primitive is a soft, muted taupe/grey and I decided on that as my base. I applied it lightly, but with pretty full coverage on all the pots, inner pot rims, saucers faces and outer rims.

TIP: I recommend cheap chip brushes for a casual paint project like dry brushing, because the uneven bristles offer an imperfect finish.
 planters and pots for a french cottage farmhouse look")
STEP TWO:
Apply the base paint color. It was a warm, breezy day and I worked right at my kitchen counter on top of a few opened up paper bags to protect my counter. With the sun room door open, the paint was drying very quickly. By the time I painted one side of one set, I was able to flip them and do the other sides. And then, I worked on the next 2 sets on the counter-top. If you need to speed along the drying, you can use a hair dryer. Just don’t get the paint too hot, too fast, unless you like a crackle effect.

TIP: I chose to paint the inside of the pot lip, just to the soil line, for a more finished look.
STEP THREE:
Apply the second and final paint coat. Once I worked through all the pots and had them coated with the Primitive base coat, I moved on in the same fashion and applied the Everlasting (white) second layer of paint.

TIP: To recreate this finished look – on the final coat of paint (white), lightly load the brush with paint and apply with a light, feathery touch in a vertical direction. Then again, covering the surface in up and down strokes, creating an imperfect cross hatch pattern of sorts. Practice on a paper bag first to get the feel for how much paint and pressure to use.

There are no hard and fast rules to this sort of project and everyone has their own style of painting. If you don’t like the final look, try adding more base color and applying the finish layer again! Or, a little sand paper might reveal just the look you are going for. Several people asked about protecting the pots with wax, and if you plan to use them outdoors, I’d suggest not doing that. Find a clear water based varnish or a clear non yellowing brush on or spray poly.
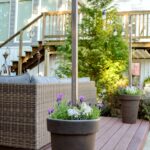
When I get all my pots planted and on my deck, I’ll make sure to share a few more images with you! Happy painting and planting, xo Shannon

UPDATED: See my pots all planted-up, and tour my potted deck garden [click here]. You can see how the pots wear with no protective coating, and I share all my planting combination and flower types for you too!


Happy Friday and have a great weekend!…Love the pots Shannon!
Thank you Shirley!! You too, happy weekend 🙂
I really like the way your pots look!
good job 🙂
Thanks a bunch Ginny!
These are sooooo cute & cozy.
Happy Friday!!!!
Paige.Rose
From
TheQuaintSanctuary.com
Thanks Paige ?? You too!! ? FriYAY!!