How To Paint Harlequin {a simple DIY tutorial}
Today I am sharing a tutorial on how to paint a harlequin pattern in under an hour! From mapping out the pattern, to painting it! This is a simple paint pattern and much easier than you might think. In fact, I wanted to call this “Harlequin for Dummies” But I’m always afraid I might offend someone. Even though, I was really referring to myself!

This has got to be my favorite painted makeovers to date.

Mostly, because I surprised the hell-o out of myself that I could do it! On a side note, I find it difficult not to end every sentence with “!”.
Okay, back to the tutorial. I found this table at a thrift store for a whooping $5 — and because I don’t rush anything, and had no idea how I wanted to paint it.. I gave it a quick one-two with some sandpaper. (It was in rough shape! See?)

Slapped on a light coat of primer, and placed it in my living room so I could look at it daily and let it tell me what it wanted.

It was not very vocal. It sat there a few months.
I’m so glad it did. Because one day, it sat up and said; “SHANNON! I want to be Harlequin baby!!”
And I said, well alright.

By that time, I had become a Maison Blanche retailer, and I had nothing but paint colored candy to choose from! (what a perk)
I ultimately decided on Magnolia and Miel, respectively.


Next, I went about mapping the harlequin pattern… I found my center point, then I tried tape and a few other methods, like cutting a template. With no luck. I am not “mathy”. The only math I can rock is figuring out a discount when I’m shopping. I can do that in a snap.
And then I figured, I can draw a straight line, I must be over thinking it!
After all my failed attempts, I ended up doing the whole grid, with a pencil and a yardstick in 15 minutes.
First you need to find your center. (Nope, this isn’t yoga — wrong blog)
How to get your center point;
I highly suggest the ease of a yardstick but you can use a tape measure.
-
Measure the length of the table and divided by two.
Mark the center point lightly in pencil.
-
Using the first pencil mark as an indicator for where to lay your tape measure or yard stick down, measure the width of the table, divide by two, and adjust your first mark to the true center you get with this measurement.

Next, I used my yard stick and working from the center, I drew first my diamond.
Your measurements will depend on the size of the diamond you want.
I wanted my diamond 18 high X 9 wide.
So from the center I went 4.5″ to the left and 4.5″ to the right and marked those off.
For the vertical marks, I went 9″ up from the center and 9″ down from the center.

Once I had my first diamond done, I worked off that, spreading out.
Using the fixed side as a guide, I lined my yardstick up to it and penciled in another line.


Working off the four sides of your original center diamond as a guide, pencil in lines and extend to those off the table.

Keeping in mind, you still have your two original lines that you used to find your center, measure over 9″ and make a dot.

Then, you’ll want to measure out the length of one section (mine were 9.5″) till you hit the pencil line and you’ll meet at the correct point to make your next mark.

See the perfect new line in red?

Just Keep Repeating The Formula.

And you’ll have a perfect grid! This one took 15 minutes to pencil out. And I had never done it before.
I penciled all my lines onto the base coat of Miel, then cut in and hand painted my white Magnolia in, following my pencil marks.
You can use tape if you want crisp lines. I didn’t use tape because I wanted a more casual, imperfect line and a hand painted look.
I don’t have a picture of this stage, because I got so excited it was working, I didn’t take any. As a matter of fact, I was talking to my mom on the phone while I was doing it, that is how easy it was! Then “poof” I was done.
Oops.

I went over each color again. For a total of two coats each.

After doing that.. I knew I wanted a stronger line of delineation between the Magnolia and Miel.
I went ahead and did my distressing. Then I used my paint can opener with it’s perfectly curled end, the yardstick as a guide, and lightly “scored” along the line, with just enough pressure to remove the paint.

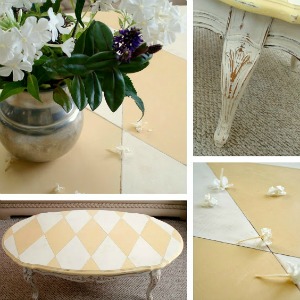
And this is my beauty now…


The table top in Miel & Magnolia is finished with Cire d’ Antiques wax in Amber.

Table base and legs in Magnolia, were completed with Cire d’ Antiques finishing wax in Dark Brown.
Just a reminder of what I started with…
I hope if you love the harlequin pattern as much as I do, you’ll give this a try! It’s so rewarding.
I never thought I would be showing a before & after painted makeover in a Harlequin pattern. That is for sure!!

Click Here For MORE Paint Makeover Project Ideas

This content is original to Fox Hollow Cottage and belongs to Shannon Fox.
Appearance in full on any site other then Fox Hollow Cottage is theft!
Appearance in full on any site other then Fox Hollow Cottage is theft!

Subscribe for free today to receive all my latest DIY tutorials, decorating ideas, upcoming projects & more, sent right to your in-box!

Join us on our adventures... and let's make our houses "homes" together!
Your email address will never be shared or sold. I promise!
More Ideas & Inspiration
 How To Replace A Toilet Wax Ring
 Repurposed Wine Bottle Crafting {how-to cut a wine bottle video tutorial}
 How To Stencil With Chalk! {tips to get it right}
 Easter Spring Cadbury Egg Sugar Cookie Dessert Recipe
 How To Watermark Photographs Using Picmonkey
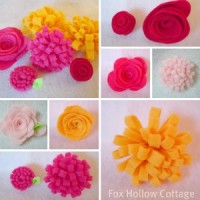 It’s a Felt Flower Fiesta!! (with a step-by-step tutorial)
 20 Ways to Make Thanksgiving Extra Special
 More Summer Decor and a DIY Paint Makeover
Absolutely gorgeous, Shannon! Thanks for sharing a fantastic tutorial. Megan
Shannon you are such a whiz! I adore this and think the colors are perfect. I’m not much of a painter but your paint sounds interesting. I’m definitely checking it out. Thanks for hosting the POP party…it’s a blast. :o)
This is beyond FAB, Shannon!! I just scored a similar style rectangular coffee table that would be perfect for this treatment! Pinning. 🙂
xo Heidi
Why am I just seeing this NOW? was I living under a rock for the last couple of days? I must have been. I just LOVE LOVE LOVE it..I love the colors the creaminess ..its all so classy and warm….
So glad you figured out the line method…I am not mathy and I couldn’t even handle that…LOL! I had to just find my center and use a template…
I soooo love this table.
Hugs,
Karin
artisbeauty1@gmail.com
Shannon! My head is going to explode with how amazing this looks – you are incredibly talented…everything all lines up so neatly and the distressing is over the top 🙂
I am looking at a table in need of paint. As a very, very non-mathy woman, I love your directions. Thanks! Oh, and your table looks great!!!
This table is beautiful and really stands out in the room. Quite a transformation and a lovely one for sure.
If you have a minute come check out my before and after Kitchen makeover post. Have a great day!
x
http://www.homeswetabode.blogspot.com
you did such a beautiful job and i love the soft colors! i have done harlequin before, but i feel like i cheated- i used a stencil…. ssshhhh
I am loving this! Thanks so much for sharing and providing the great tutorial! I’d love for you to share it at my party, Twirl & Take a Bow at http://www.houseontheway.com tomorrow.
Leslie
This a A-Maze-ing! My armoire just spoke up and said “Me Next”! I love the harlequin pattern but it just seem so Major League. Your tutorial makes it all seem possible. Oh, ya I will be doing a copycat. I absolutely love this table!!!
Girl I LOVE LOVE LOVE this table and I featured you and your shop over at my blog today!:)
Love your table…it turned out fantastic! I did a harlequin pattern to a living room wall and an entry wall {Same colors} in our old house…loved it. Wish now I would’ve taken more pictures of all of the transformations we did in that old house. We gutted & completely renovated it. Turned it into a 4 bedroom 2.5 bath from a 3/1.5!
What a fantastic job,and great post Shannon. I love your work and the table is beautiful. Thanks for sharing the tutorial … I’ll try to muster the nerve to try it once my paint arrives. Blessings from Australia! Shirley x
Non-“Mathy” girls unite! This is seriously awesome Shannon and the table looks amazing! It definitely wanted to have a harlequin pattern painted on and you did such a fantastic job. 🙂
Vanessa
Love your table & the tutorial!!