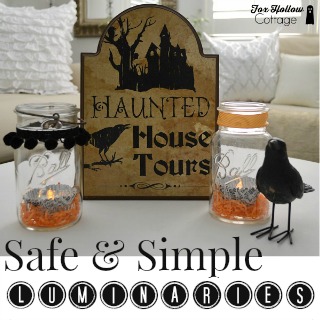
Safe and Simple Halloween Mason Jar Luminaries
Come on in. Let’s make some Safe and Simple Halloween Mason Jar Luminaries together. It just takes a few items to whip these cuties up and get glowing, safely!

Hi there Foxy Friends! I meant to share this idea a bit sooner.. I really did. The good news is, these qt’s only take like 5 minutes to whip-up so it shouldn’t make much of a difference!
I made a set for the 4th of July, but I did them the day-of, so it was a little late to share them and have them do much good for y’all! I promised myself I would do a Halloween version and share them, because I really like how easy they are and I think they are pretty darn cute to boot.
I thought you might like them too.

Plus, I found these Halloween baking cups so it was totally a sign!

You will need:
-
Mason Jars. Wide mouth are easiest to work with. (they can be old spaghetti jars or the like as well, it all works!)
-
Battery operated tea lights. (this is where the SAFETY comes in) a real bonus!
-
Cupcake liner baking cups.
-
A long handle wood spoon or chop-stick
-
Straight Pins, Glue Gun and/or Double Tape (the proper tool to attach whatever embellishments you want to use.)

Miscellaneous embellishments:
-
Ribbon, Twine, Pom-Poms, Burlap…
-
Buttons
-
Shred
-
Rhinestones
-
Glitter
-
Etc…

This is what I did:
-
1 – Decorated my jars with ribbon first.
-
2 – For the black pom pom trim, I simply used a straight pin in the back to affix.
-
3 – For the orange ribbon, I used double sticky tape. (I didn’t feel like heating up my glue gun for one dot!)
-
4 – Added orange shred to jar bottom.
-
5 – Dropped in cupcake liner.

I guess part of the whole “no fade” feature with the baking cups, is that they are lined.
Well, it’s metallic!

Bonus for throwing that light around when you pop a tea light in them. Woo.
Okay, back to my super-serious directions…
-
5 – Turned on tea light.
-
7 – Added tea light.
-
8 – Fiddled to get straight by poking into place with the end of a long handle wood spoon. This is a very delicate process. No, it’s not.
-
9 – Cackled because they are so stinking cute.
-
10 – Took pictures to
show them offshare the idea with you! hahaha

My mason jars have been picked up here and there. Thrift stores, estate sales, vintage shops and the like.
The old ones are preferred.
… with the rusty workings, and the scratches.
I’ve got a few clear and a good little collection of the aqua pretties. I always wonder what they were up to before they came to me? Sometimes there is a story. Sometimes I just guess.

I had BIG PLANS to make the cutest sign for Halloween… oh well, maybe next year?
This one was under $5 – from ROSS. Worked for me!!

You could definitely make these more elaborate, but it sort of defeats the whole “quick & easy” vibe. With these, you can pop-off the ribbons, remove the guts, and have a perfectly plain mason jar to use again and again!
Thank you so much for stopping in to read today!! I appreciate you visiting.
I hope you enjoyed this simple Halloween decoration.
Happy Halloween,
Shannon


Subscribe for free today to receive all my latest DIY tutorials, decorating ideas, upcoming projects & more, sent right to your in-box!

Join us on our adventures... and let's make our houses "homes" together!
Your email address will never be shared or sold. I promise!
More Ideas & Inspiration
 Vintage Americana Patriotic Pool Noodle Wreath
 Style Showcase Week 1 | Fall Home Ideas
 Diy Hard Wood Floor Reveal {sort of}
 New Year’s Eve Diy Decorating Ideas
 Style Showcase 98 | Everything FALL Pretty Ideas For Home
 One Dollar Thanksgiving Table Runner
 Christmas Printable Rudolph on Burlap
 It’s a Shiny Brite Christmas {with a Retro Vintage-Vibe}
How cute! I love your use of battery tea lights. This would be a great idea for placing on my doorsteps for Halloween night.
So glad you enjoyed the idea. I’ll be making a Christmas version for sure. Gotta love a little glow 😉
So of course I love that sign, but I might have to help decorate a bar/grill on Halloween and the mason jar lights with metallic liners is perfect.
Simply adorable! Love the cupcake liner idea and the safe tea lite is perfect!
Thanks Debbie. Just one of those easy things anyone can pop together 🙂