Vintage Style Dollar Tree Pumpkin Makeover {a tutorial}
Hi there! I’m really excited to share with you
How To Turn Dollar Tree Foam Pumpkins into
Vintage Style Halloween Decor

It’s only 7:30 p.m. here so I’m keeping my,
“I’ll teach you how tomorrow promise”
on showing you how to make your own Cheap & Easy Vintage Style Halloween Pumpkin Platter Decor.

Did you get your supplies?
If not, that’s okay!
There is still time.
These don’t take long at all.
To Make
You’ll need:
2 Dollar Tree foam pumpkins.
3 Dollar Tree silver serving platters.
A glue gun.
Craft paint in white, tan, black.
To decorate:
Less then 24″ of Black Crepe Paper Streamer.
8 Pearl Tip Straight Pins, if desired.
Any ribbon or misc. embellishments you might want to use, glitter, broken earrings, old jewelry, buttons…
you can totally customize this.
Ready?
OKAY!
{sounds like I’m starting a cheer. lol}
Carefully slice 2 foam pumpkins in two.

Then tape one to a platter and see how you like it!

Oh, no that was just me.
Ignore that one 🙂
Next get your black paint.
I used my Maison Blanche Paint in Wrought Iron. I used Maison Blanche paint because I knew it would stick to the shiny surface and provide an ultra-matte finish.
We need to do something about those way “to-new” looking platters!!

Worked Like a Charm!
The black paint will give the illusion of an
aged patina and make the shiny, fake silver,
look like real, old tarnished silver!
Simply paint your surface.
Just lightly hit your edges but
make sure to work the paint down into the
etched design on the platter face.
Next, let it dry for a few minutes, then wipe
the paint away with a soft clothe or paper
towel just taking the excess away.
BEFORE

AFTER

Complete all three and set them aside.
Next, paint your pumpkins.
You’ll need your white and tan paint for this.
First apply the base coat of white.

Let dry, then accent with tan.
Paint to your liking-No rules.
I added the tan to make it look aged
and knock down the pure white paint.

See? It’s not perfect.

When all your painted items are good and dry, go ahead and glue them together.

Now..
It’s time to
DECORATE.
The decorating part is my favorite!
Get your paper streamer.
Cut double the width of the pumpkin and scrunch it up accordion style. Glue your ribbon to the end, then slowly glue as you keep your crepe paper streamer bunched up. Glue ribbon to opposite end.

Then, take your embellishment and secure with glue to one side of the pumpkin and work your way across to the other side of your pumpkin, glue in place.
And it will look like this!
I added another layer of ribbon for even more dimension.

Same for this one.
This stage is where you can really embellish them to your liking! You could use any color ribbon, streamers, jewelry, buttons, paper crafting items…
“BOO” would look cute!
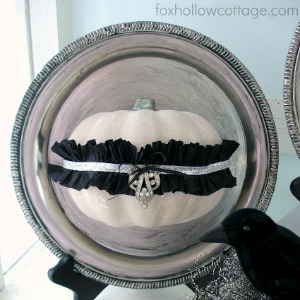
I added a vintage shoe clip to mine.
For the last pumpkin.. I used some silver tinsel garland, sheer ribbon and
pearl tipped straight pins.
That I have had for years! and have no idea what I bought them for???

Same idea.
Glue on the garland.
Then the ribbon.
Stick the pins in!

I finished off my stems with some
Martha Stewart black glitter paint.

If you have some spooky crows..
Find out what I think is

… and that’s it!
an inexpensive craft you can customize.

Hope you liked my easy tutorial on how to makeover cheap, Dollar Tree pumpkins into
Vintage Style Halloween Decor with
Tarnished Silver Platters.


Linking Up At:
Stuff And Nonsense, Mod Vintage Life
This content is original to Fox Hollow Cottage and belongs to Shannon Fox.
Appearance in full on any site other then Fox Hollow Cottage is theft!
Appearance in full on any site other then Fox Hollow Cottage is theft!

Subscribe for free today to receive all my latest DIY tutorials, decorating ideas, upcoming projects & more, sent right to your in-box!

Join us on our adventures... and let's make our houses "homes" together!
Your email address will never be shared or sold. I promise!
More Ideas & Inspiration
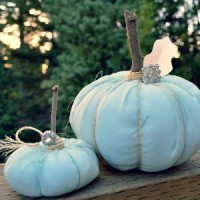 Make A No Sew Fabric Pumpkin
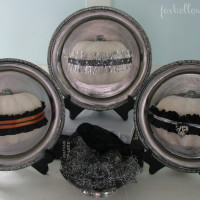 Vintage Style Halloween Pumpkins
 Martha Stewart Decoupage Halloween Craft
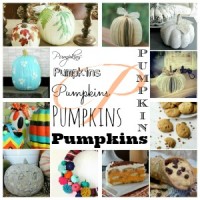 Twelve Fabulous Pumpkin Ideas to DIY Create Craft and Cook
 Gilded, Gold and Glam Organza Pumpkin Makeover
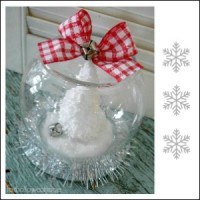 Dollar Tree Christmas Snow Globe {tutorial}
 Twenty Halloween Mantel {and more} Decorating Ideas!
 30 Plus Featured Pumpkin Ideas for Halloween and Fall
ok, so I have scouring Pinterest for ideas and not alot really stood out to me, until I saw these!!! I think these are wonderful, do able and AFFORDABLE!! Thank you so much for this idea now I gotta run to the Dollar Tree!!
So glad you like them! I love cheap and these little foam punkins are the best to craft with. No pressure since they are a buck 😉
These are so cute! I have a few dollar tree pumpkins left over I think I may have to make a display for my dining room buffet! – Jacque @theDIYvillage
Hi Shannon,
What a wonderful pumpkin project. Love, love it! They look awesome!
Lisa
WOW! I’ve missed a lot in a week! These are way too awesome! Love, love, love, love, love!!!! Makes me wish I had gone black and silver with my fall decor. *sigh* Oh well, there’s always next year. 😉 Great job, Shan! And way, way cute!
These are really creative Shannon! I would never of thought to cut them in half an mount them on a platter! Pretty!!
Kim @ Sand & Sisal
I love this Shannon!!! Hmmm…might need to get my bootee to the dollar store today.
XO
Kristin
Genius Shannon, love them and so darn affordable too! I’m pinning this even if I don’t get to it this year there is always the next;)
Rondell♥
Ok, so I’m pinning those, but I can’t help but think the big ‘ol knife chopping the orange one in half is equally creepy.
Bliss
Super easy and super inexpensive, Shannon! Great project!
this is such a neat idea! 🙂 thanks for the how to!
You are a crafty genius!!! I adore these! I am so going to the Dollar Tree today so I can make my own!
Now that is crafty Shannon! I love it and have pinned it for next year. I’m all done with fall for this year. Thanks for sharing and I hope you have a wonderful day, Gail
Beautifully done Shannon. Wish we had Dollar Tree here in Australia… it sounds like it has some great stuff.
Love, love, LOVE! I adore these pumpkins and I just have a leftover dollar tree pumpkin and a serving platter! I think I need to get my craft on.