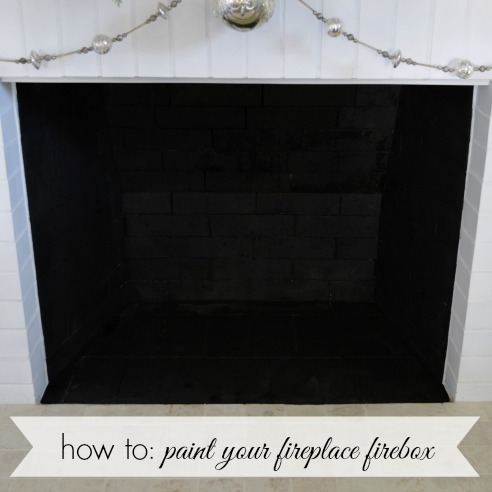
How To Paint A Fireplace Firebox
This is one of those simple home improvement projects that makes a big difference in the look of your fireplace! It only takes about 30 minutes to paint and refresh your fireplace firebox, and I’ll share with you exactly how to do it.

Thankfully, this is the final step of our fireplace makeover! I had put this task off for far too long, but I finally finished it today. I must say, when I was done I stepped back and thought to myself; “Why the heck did I wait so long to do this?”
Yep, it was one of those. A night and day difference. I can not believe how it finishes off the fireplace. I am so pleased. So much so, that I thought I would share with you, in case any of you are living with a icky firebox like I was!!


HOW TO PAINT A FIREPLACE FIRE BOX:
-
CLEAN & DRY — You will want to start with a clean, dry, dust free surface. I thoroughly cleaned my firebox before starting by sweeping the entire surface, then vacuuming with my brush attachment. You may need a wire brush as well.
NOTE: If you have any creosote build-up in your firebox you’ll need to remove that before moving forward. Use a creosote cleaner like this to do the job [Creosote Cleaner, click here].
-
THE RIGHT PAINT — You’ll need to select a High Heat Tolerant /Resistant Specialty Paint. There are several brands on the market. Look for a flat black, heat-resistant paint that will withstand temperatures up to 1,200° Fahrenheit. [I used this paint, click here].
-
PREPARATION — Cover any surface you do not wish to be painted with painters tarps for protection . Like the hearth. Because painting with a roller makes splatters even if you go slow and you will inevitability drop a tiny splat of paint onto your new hearth tiles if you don’t put down a cover. Do not ask my how I know this. Jim, please pretend you did not read this. I’m just speaking in generalities honey.
-
THE RIGHT TOOLS — You will need a rough surface paint sleeve suitable for masonry. I applied the bulk of my paint with a roller. I then used a Purdy angled brush for the detail work, like the corners and cutting in along the edge. I free handed mine, but 3M makes an awesome rough surface tape if you want the extra protection and guidance.
-
BE SAFE — Follow all safety instructions on your paint. I had excellent cross ventilation, by working with my front and back doors, as well as all my living room windows open. Don’t mess around with fumes!
-
APPLICATION — Apply the paint with a even pressure with your roller, cutting in with your brush. I applied a light first coat, then followed with a second coat. Be patient. Cure time (complete drying) can depend on paint selected and weather conditions.
This project takes about 30 minutes to complete and costs about $20 for the paint.
Supply costs for the extras may vary, I had everything on hand.
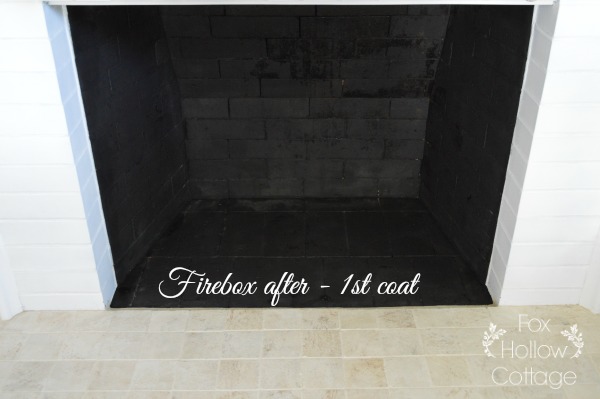
Note: The paint is not fully dry in these photos, so there is a little shine.
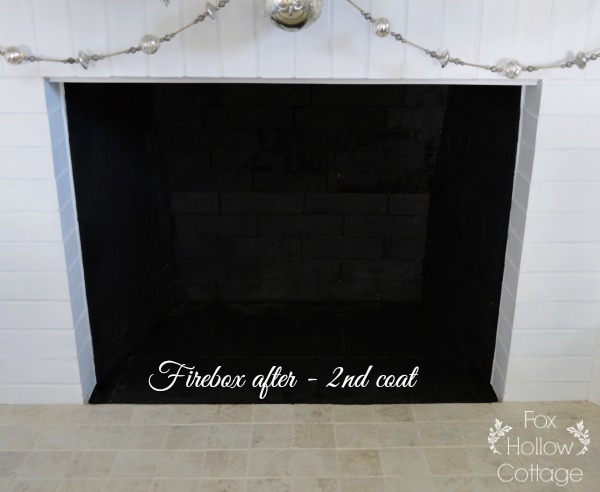
After you’re done, stand back and go… OMG, that girl was right, it looks AWESOME now!
You’re welcome.
Cheers to fabulous fireplaces. And just wait! Because it looks Even BETTER when you get it all decorated. I decorated the mantel and hearth when I was done and it looks better than ever. Just so much more “finished“, ya know?
Happy DIYing!! Shannon
[CLICK HERE] For Our Under $150
DIY Mantel & Hearth Fireplace Makeover

We’ve since added some shiplap above the mantel, it was another simple project and cost about $30 [click here for the tutorial]

How To Paint A Fireplace Firebox

Subscribe for free today to receive all my latest DIY tutorials, decorating ideas, upcoming projects & more, sent right to your in-box!

Join us on our adventures... and let's make our houses "homes" together!
Your email address will never be shared or sold. I promise!
More Ideas & Inspiration
 Delightfully Farmhouse Flavored Home Tour
 Holiday Housewalk Cozy Cottage Christmas Tour
 Budget Board And Batten Entryway Makeover
 Year Round Southern Outdoor Porch Entertaining
 Little Cottage Exterior Paint + Dutch Door Reveal
 Guest Room Essentials {tips and ideas to play the perfect host}
 How To Make Beautiful Wreaths – 40 Handmade DIY Tutorials
 Living & Dining Room Fall Refresh And Our New Chandelier
Oh. My. Gosh! You were SOO right! It looks amazing! I guess that I’ll need to grab some paint while I’m at the hardware store today. LOVE it!
See? I know. Head smacker for sure when I was done. I love how clean and new it looks. Yay.
Cheers girl, cheers it looks awesome!!!!!!!!!!!!!!
It looks fabulous! Love the transformation! 😀