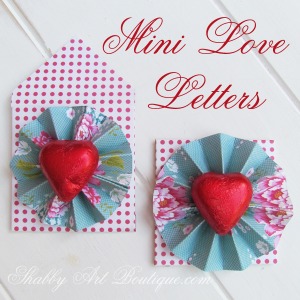
Mini Valentine’s Day Love Letters {a diy craft}
A little love letter… that is big on LOVE
Hi, I’m Kerryanne from Shabby Art Boutique in Australia.
I’m an old fashioned apron wearing girl who enjoys putting the homemade and home baked back into everyday living… with a shabby vintage touch!
I’m delighted to be popping in here today to share my love letters with Shannon’s foxie friends.

Have you ever received a love letter or note?
Ever written one?
The humble love letter has been a romantic way to express feelings throughout history.
LOVE…. pure, old-fashioned, never goes out of style LOVE… will put a smile on anyone’s face.

My husband began leaving me ‘love notes’ early in our courtship.
They popped up unexpectedly in all sorts of places… under my pillow, taped to my steering wheel, in my purse, the pantry, hidden in a pocket… and usually when I least expected them.
They weren’t one thousand word sonnets filled with breathtaking romanticism… hmm, he was no Shakespeare, let me tell you!
No, it was just a sentence of honest heartfelt words that reminded me that he loved me…
And in turn, why I loved him.

Twenty eight years later, he still surprises me now and then with a love note.
Not a text or Facebook message…..
A real handwritten note… folded up and left to put a smile on my face.
You are never too young or too old to have your heart filled with love.

This project is quick and easy to make and is a fun way to make someone’s day.
Materials:
One sheet of double sided scrapbooking paper,
Ruler, pencil, scissors (or craft knife),
Stylus to score lines,
Glue,
Foil coved chocolate heart.
Instructions:
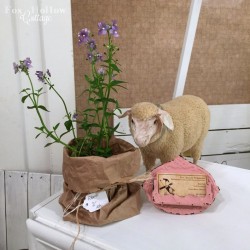
1. Cut a square measuring 4 1/2” x 41/2” from the scrapbooking paper.
2. Measure and mark the edge of each side at 2” and 21/2”.
3. Score the lines as pictured below.

4. Cut out the little triangles created around the edge of the square.
5. Fold along the score lines to create the envelope and use a dot of glue to secure the three folded sides together.

6. Cut a strip of coordinating paper measuring 12” x 11/2”.
7. Concertina fold your strip at ½” intervals.
8. Glue the two ends together to form a circle.

9. Adhere the concertina circle to the front of your envelope with a dot of glue.
10. Attach the chocolate love heart to the top of the concertina with a dot of glue or use a piece of double sided tape.
All that’s left to do is pop a love note inside and seal the back of your envelope.

This project is perfect for a whole lot of uses: a love note for a Valentine, a sweet lunch box note for the kids, a thank you to a teacher or friend… or maybe just a simple anonymous ‘Hello’ left to surprise someone special.
I’d love for you to come visit me for more handmade fun at my blog, Facebook or Pinterest.
Thanks for letting me hang out here with your peeps today Shannon!


More Ideas & Inspiration
 Spring Show Recap and Some News!
 PRIMP YOUR PUMPKIN 2 all about the pumpkin
 Indoor Outdoor BBQ Party Entertaining Ideas
 Style Showcase 122 | Brilliant Home + Garden Tips and Ideas!
 Simplified Decorating Fall Home Tour
 Best Fall Porch Decorating Ideas
 Sunday Night Date with Nate!
 How To Set A Casual Easter Table
These are adorable!!! Love, love!~~Angela
Aren’t they so adorable!!?
These are so adorable and sweet Shannon!! Pinning! xo
I love, love, love this idea! My hubs is very romantic & this would be a perfect way to return the romance!!! Thanks for sharing your awesome creativity w/ us less fortunate!!!
hahaha. People less fortunate, I’m sorry but that made me laugh 😉 This one is darling right? From Shabby Art Boutique. Sweetly shared while I’m on vacation. Thanks for stopping in!!