The Pink Petal Flower Tutorial
More Felt Fun!
I know I promised the “petal” flower tutorial but I got carried away with coffee filters… Oops. Sorry
(You can see my Coffee Filter Wreath with Burlap Roses here.)
I Didn’t Forget Though!

You’ll need the same supplies as we used to make the Roses & Mums.
You’ll find the Making Roses & Mums Tutorial here.
Supply List;
Felt, Scissors & a Glue Gun.
If you want to try your hand at the Roses…
This is So Simple, You’re going to Love It
(Plus, I took lots of photos so it should be pretty clear)
But, if you have any questions, just comment and I will answer them the best I can asap.
Let’s Get To The Petal Flowers!
Let’s Get To The Petal Flowers!
Next scallop the outer edge of the felt.
Then, just as with the other flowers we made,
start rolling away.
It starts looking like a flower pretty fast =)
Which is great, because I am all about
The reason I cut that little apostrophe shape
at the end/center is because it fits perfectly
onto the bottom and finishes it off, all in one piece.
at the end/center is because it fits perfectly
onto the bottom and finishes it off, all in one piece.
Put glue all over the flower bottom and place the flap over the glue.
See? It flips over and ta-da!
It’s Finished.
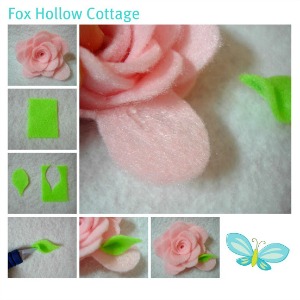
I thought a fresh little green leaf might be sweet so I gave it a shot.
Cut the felt free-form, into a leaf shape, then place a drop of glue at the base and gently fold over for shape.
Next, place a tiny dot of glue on the petal of choice and affix leaf.
Repeat…
and make yourself a whole bouquet!
This content is original to Fox Hollow Cottage and belongs to Shannon Fox.
Appearance in full on any site other then Fox Hollow Cottage is theft!
Appearance in full on any site other then Fox Hollow Cottage is theft!









I just linked from Think Pink Sundays. So glad I did. As you know felt flowers are everywhere but yours are special. I see a trip to get some more shades of felt real soon. That’ll help me get the clutter control accomplished, LOL. Ahhhh that can wait. Thanks Shannon!
Janet
craftythriftydecoratingwifemom.wordpres.com
I inherited a bunch of felt and wanted to use some to add to the hairclips I make for my girls. This is perfect, thanks! I am a new Pinterest follower visiting from Think Pink Sundays. Vicky from Mess For Less
lovely tutorial Shannon. Thank you for sharing. Hugs and smooches and wishes for a beautiful week ahead!
These are so cute!! Best I’ve seen! Now following you! Thanks for stopping by The Sunday Social at The Kurtz Corner! Hope to see you around the blog-o-sphere! 🙂
Great tutorial! I am going to have to give it a try. Thanks
I am working on a floral felt covered lampshade right now and this tutorial is brilliant!
I have already tried a few ways of making flowers. A crafter can never have enough fabric & felt & paper roses, huh? 🙂 This is a new version for me. It is really pretty. I think I am gonna make a bunch of it 🙂
Hey Shannon! Thanks for the great tutorials. How do you make the 3rd one? sales@lollylinens.com
Thanks, Katy
These are too precious Shannon! Thanx for the tutorial!
Great tutorial! They are so lovely and look like they’d be really difficult to make – yet when it’s broken down step-by-step, quite simple. The addition of the little green leaf is the cherry on top 🙂
Your photos and directions totally rock!! Thanks Shannon!
Nice tutorial. I think I might give this a try this weekend since it’s too cold to work in the shop. Love the added leaf to it. Nice touch.
Have a great weekend.
Holly
You are so stinkin’ good at these felt flowers! I’m just glad that you’re sharing your talent with all of us.
So sweet! I’m far from crafty, but with your great tutorial I think I could even do it. Love your blog. Thanks!
Amazing details! I love it! I bow down to your felting abilities! I really want to try this. Your photos are amazing too!
Debbie