I am sure you are all as fraught as I am over the news coming out of Oklahoma. If you would like to donate, here is a direct link to the American Red Cross donation page. Tricia was very excited to share this craft today. We had it scheduled to go up before the Tornado hit Oklahoma… changed, and cut short so many lives. I am, unfortunately, too frequently at a loss as to how to proceed with my everyday life, when others lives have been ended or become so mangled they are not even recognizable? Do you celebrate life and move on… pray, be silent and pull back? I am usually a jumble of everything with lots of tears mixed in. Shannon
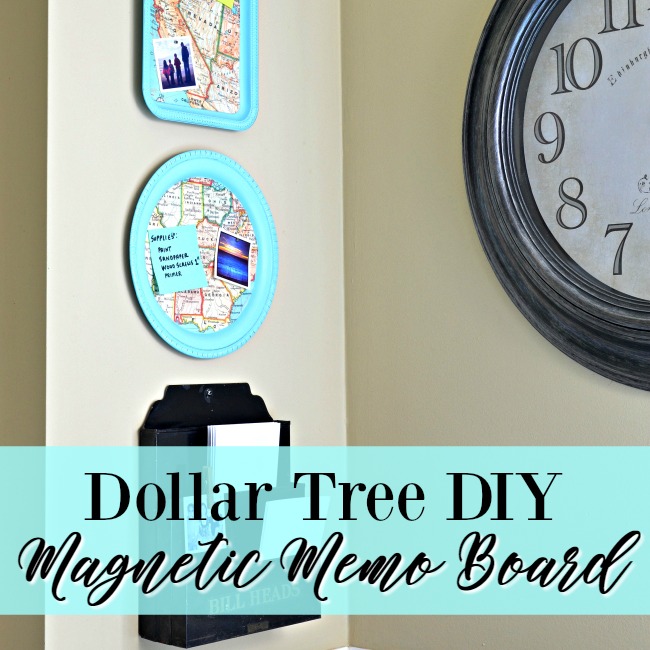
A DIY Dollar Tree Magnetic Map Tray Craft

Hello again, Fox Hollow Cottage readers! I’m Tricia from Simplicity
in the South and I’m so excited that I get to share a Dollar Tree
craft project with all of you today!
I’ve slowly been working on putting together a small office area in
one corner of our kitchen, right next to where I do most of my
blogging.
So, given the challenge of finding inexpensive ways to keep me
organized, I started out with these beauties from the Dollar Tree.

With a few other supplies, I turned them into useful magnetic memo
boards so I’ll have a place to keep Post-it notes, receipts and
pictures.
Other than the trays, you will need:
Sandpaper
Spray primer and paint (I chose Rustoleum’s Aqua.)
A scrap piece of paper for your template
A map (I found this map printed on thick archival paper on Amazon.com.)
Mod Podge
A sponge brush or paint brush
A picture hanger (see the picture below)
E6000 glue
Scuff up the trays with sandpaper to give them some grip for the spray
paint. After wiping the trays down with TSP, give them a coat of
primer, then spray paint. There are so many different colors in the
map you could choose from but I love how well Rustoleum’s Aqua matched
the watery blue from the map.

Make a template before you cut the map by laying a piece of paper on
the tray’s back and pressing an outline with your fingers.
TIP: After I cut out the template, I
held my map up to the window, laid the template on top, then traced
the area of the map I wanted to cut out.

Put a thin layer of Mod Podge on your tray. Lay your map cut-out on
top and apply another thin layer of Mod Podge on top of the map.
Ignore the wrinkles. There’s a utensil for that.

Use the back of a spoon to smooth out the wrinkles before the glue
gets tacky. Then smooth the glue back out with the brush. I love using
matte Mod Podge because it doesn’t show imperfections nearly as much
as the glossy does.

Clean up any excess Mod Podge with a damp paper towel or Q-tip.
The last step is to glue a hook on the back with E6000.

Wait a few hours for the E6000 to dry then hang up your magnificent
magnetic memo Mod Podge map trays. Whew! That’s a mouthful.

The edges of the tray look even prettier with a little distressing,
don’t you think?


I have another organization project using the rest of the map for my
little corner of the kitchen coming up soon. So, I hope you’ll follow
along on Simplicity in the South to see how it all comes
together!

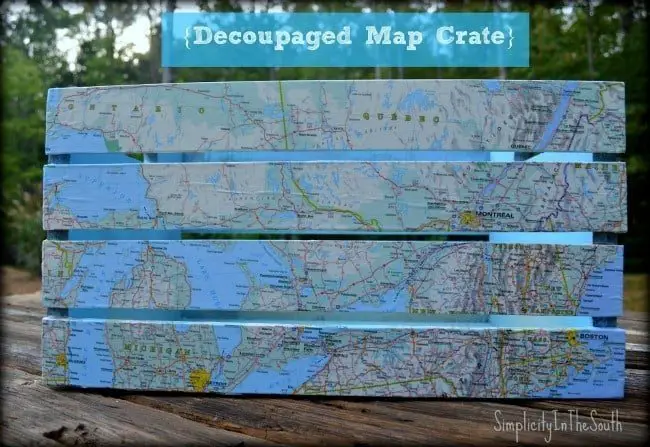
Want to see another Mod Podge and map project ? Come check out my decoupaged map crate tutorial.
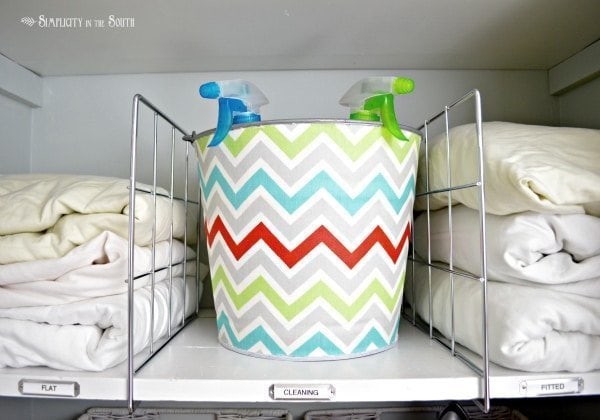
You can even decoupage fabric on galvanized bins like the one I
used when I reorganized our linen closet!
Thank you, Shannon, for letting me share another project with your
lovely readers!

Tricia is multi-talented and I’m so thrilled she pops over once a month to share her awesomeness with us!!
Although… we sort of got her twice this month (but who’s complaining?)

Again… thoughts and prayers for those suffering.


More Ideas & Inspiration
 Make A No Sew Fabric Pumpkin
 Pool Noodle Wreath Tutorial {a diy craft}
 Dollar Tree Christmas Link Party Features (and 100+ Ideas!)
 Dollar Tree Christmas Party {plus a $50 GC giveaway}
 Dollar Tree Christmas Snow Globe {tutorial}
 Vintage Style Dollar Tree Pumpkin Makeover {a tutorial}
 Organize Your Closet with 10 Things for Under $100
 Make Your Own Shabby Vintage Candles
I love this idea. We are doing a craft table for our ice cream social at our club. I started thinking maybe using tissue paper and letting the kids tear them and mod podge them on it. Should we still paint them? Did you find magnets at Dollar tree or is there somewhere where we can get a package of magnets? Any suggestions?
what a great idea thanks for sharing.
Love this!!! Pinning! 🙂
xo, Claire
What a fun, easy project!
Too cute!!! I love the first one with KY right in the middle 😉
I thought of you and Karianne at Thistlewood Farms when I made it!
So cute! Love the color too.
Awesome project, Tricia — thanks for sharing!
So crushed by the tragedy in Oklahoma — all I can do is pray.
xo Heidi
I love this project! I’ve used maps in so many different ways but not like this! I think my to-do list just got longer!
You and me both! Just too many great ideas to keep up with sometimes. Super problem to have though 😉
Great project! Love this idea. The blue really does go so well with the maps.
Thanks, Kathy! This is my go-to color for blue spray paint. It’s even prettier in person.